
Provisioning DC/OS on AWS using Ansible
In this first post I’ll present my current pet project for provisioning DC/OS on Amazon AWS using Ansible called ansible-dcos-aws-playbook (hosted on GitHub). I’m really interested in the technology and ideas that emerged in recent years and that is rapidly becoming mainstream, i.e. containers (Docker), container orchestration (Mesos, DC/OS, Kubernetes etc.), cloud native applications and infrastructure-as-code. There are quite many ways that you can experiment with this technology, it’s a breeze configuring a basic DC/OS cluster on AWS using a CloudFormation template and is equally simple on Azure. This is all good but I don’t quite fancy the wizard approach even if its admittedly handy.
What I would like to have is a way to automatically and consistently setup and tear down a cluster over and over, according to immutable infrastructure and infrastructure-as-code principles. This gives the freedom to experiment and if something is messed up, just tear down the cluster and build it up again and you will have a fresh start. By having the cluster setup defined by code, in this case an Ansible playbook, the cluster configuration can be debugged and improved over time, just like any software code. Doing stuff manually doesn’t quite provide the same consistency.
Secondly, I would also like to have a provider-agnostic way of configuring the cluster. Nothing wrong with the wizard approach but it kind of couples you to a specific provider. Switching to a different provider would include a learning curve and possibly technical difficulties. The approach taken by the ansible-dcos-aws-playbook project is instead to rely on very basic IaaS services such as virtual machines and networking, potentially configuring the cluster on any IaaS provider or in a private data center.
The ambition is that the configured cluster should be a production worthy setup according to best practices (its not quite there yet but it is progressing) but it can also be used to experiment with different technology stacks and/or different configurations.
The current version is developed and tested on AWS but the plan is to support GCE and Azure as well as on-premise metal or VM cloud. Likely, this will result in spin-off sibling projects such as ansible-dcos-azure-playbook that manage the IaaS infrastructure while reusing the DC/OS related roles. A similar project is also in the pipe for Kubernetes.
Try it out
Enough background, the rest of the post will guide you through a tryout of the project. In the end you will, if all goes well, have a working DC/OS cluster provisioned on an AWS virtual private cloud (VPC) fronted by an elastic load-balancer (ELB) and a simple demo application running.
Prerequisites
To try the project, you’ll need: * python, python-pip, boto and boto3 installed. * Ansible 2.2 or later installed — the cluster is configuration is defined by an Ansible playbook. Ansible is my tool of choice since it quite powerful and agent-less. The only requirement is that the target host(s) support SSH and have Python installed. Version 2.2 is required since it comes with some new and nice updated cloud modules, especially related to networking. * An Amazon AWS account.
Configure your AWS credentials in ~/.boto as described in Boto Config:
[Credentials]
aws_access_key_id = <your_access_key_here>
aws_secret_access_key = <your_secret_key_here>
Add your AWS SSH key to the ssh-agent:
$ ssh-agent bash
$ ssh-add ~/.ssh/<amazon key file>
This is needed for the Ansible playbook to properly authenticate towards AWS and the EC2 instances. The amazon key file should be the private part of the key you specify below for AWS_EC2_KEY_PAIR.
Getting started
Begin by cloning the repository
$ git clone https://github.com/olatheander/ansible-dcos-aws-playbook.git
Initialize the Git submodules (the generic Ansible roles are included in the playbook as submodules)
$ git submodule update --recursive --init
Configure the AWS environment variables:
$ export AWS_EC2_KEY_PAIR = <the name of the key-pair for EC2 instances>
$ export AWS_EC2_LB_CERT = <the arn resource for the AWS ELB certificate>
$ export AWS_S3_ELB_LOGS_BUCKET_NAME = <the name of the S3 bucket where to store the ELB logs>
By defining these two variables a simple hello-world demo is installed on the cluster that we will later experiment with.
$ export DCOS_CONTROLLER_INSTALL_DEMOS = true
$ export DCOS_CONTROLLER_INSTALL_DOCKERCLOUD_HELLO_WORLD = true
AWS_EC2_KEY_PAIRis one of your keys found in EC2 -> Network & Security -> KeyPairs.AWS_EC2_LB_CERTis ARN identifier found in the AWS Certificate Manager for the cert.AWS_S3_ELB_LOGS_BUCKET_NAMEis the bucket id found by selecting Properties for the bucket in S3.- The
DCOS_CONTROLLER_INSTALL_DEMOSvariable is a generic switch for installing demo(s). When false this section is skipped altogether. - The
DCOS_CONTROLLER_INSTALL_DOCKERCLOUD_HELLO_WORLDtoggles the installation of the Dockercloud Hello World Docker container demo.
For the full list of environment variables checkout the ansible-dcos-aws-playbook README and the ansible-dcos-controller README.
Project layout
.
|-- community
|   `-- roles
|       |-- dcos
|       |-- dcos-bootstrap
|       |-- dcos-controller
|       |-- docker
|       `-- pip
|-- filter_plugins
|-- group_vars
`-- roles
    `-- aws
If you have some previous experience of Ansible this is probably old hat (read more about best-practices) but worth mentioning is the reusable roles included that are all stored in ./community/roles
as Git submodules. This is also the option of using Ansible Galaxy, recently open-sourced, but I prefer the submodule approach.
Run playbooks to setup the cluster
Setting up the cluster consists of running two playbooks, first:
$ ansible-playbook -i ec2.py main.yml
This playbook configures the AWS infrastructure by allocating EC2 instances, setting up VPC, load-balancer, network gateways etc. Running the playbook, you will see a lot of tasks scrolling by and it will take a few minutes to complete. When done there should be no errors and a message like:
TASK [debug] *******************************************************************
ok: [localhost] => {
    "msg": "*** Playbook done! ***"
}

PLAY RECAP *********************************************************************
localhost                  : ok=18   changed=3    unreachable=0    failed=0
If something goes wrong Ansible playbooks are idempotent so you can just fix the problem and re-run it.
When completed, check your AWS VPC dashboard and there is a VPC configured named dcos-cluster-vpc with 10 EC2 instances running.
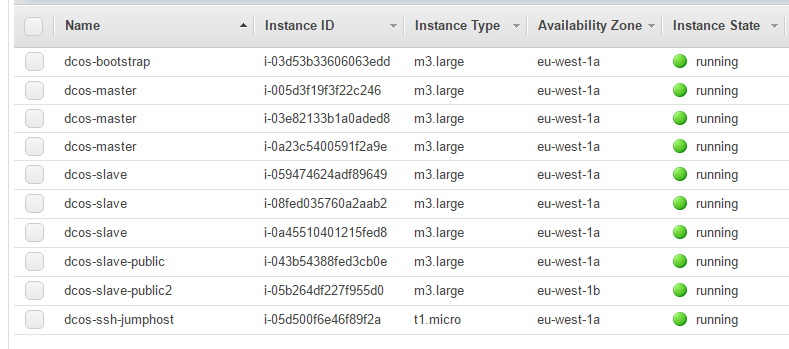
Note, dont keep the cluster running for long if you’re just experimenting. Tear down the cluster when done, see end of this article for instructions. For DCOS to be able to schedule containers onto the nodes its better to have fewer big nodes rather than many small since the scheduler may not be able to find a node with enough free resources if nodes are too small. The downside is that this node type is pretty expensive.
Next step is to provision the allocated resources i.e. setting up a DCOS cluster on top. Do this by running the playbook provision_cluster.yml. This playbook is basically a straightforward implementation of the Advanced DC/OS Installation Guide.
$ ansible-playbook -i ec2.py provision_cluster.yml -u ubuntu
The -u switch tells Ansible which user to use when authenticating towards the EC2 instances. By default, the AMI (ami-c06b1eb3) provisioned is Ubuntu Xenial 16.04 but CentOS and eventually CoreOS will also be supported. -i is the inventory parameter and ec2.py is the dynamic inventory script for AWS.
There will be a couple of ignored errors related to python-pip but this is normal and just the role checking if pip is installed.
It will take a couple of minutes setting up the cluster. Once the playbook is done you will see output like:
TASK [dcos-controller : Launch external Dockercloud hello-world sample application.] ***
changed: [10.0.0.250]

PLAY RECAP *********************************************************************
10.0.0.173                 : ok=30   changed=20   unreachable=0    failed=0
10.0.0.250                 : ok=10   changed=8    unreachable=0    failed=0
10.0.0.42                  : ok=30   changed=20   unreachable=0    failed=0
10.0.1.122                 : ok=30   changed=20   unreachable=0    failed=0
10.0.1.123                 : ok=30   changed=20   unreachable=0    failed=0
10.0.1.124                 : ok=30   changed=20   unreachable=0    failed=0
10.0.1.215                 : ok=30   changed=20   unreachable=0    failed=0
10.0.1.216                 : ok=30   changed=20   unreachable=0    failed=0
10.0.1.217                 : ok=30   changed=20   unreachable=0    failed=0
10.0.2.211                 : ok=30   changed=20   unreachable=0    failed=0
Play with the cluster
Now that the cluster is up let’s play with it for a bit. By defining the environment variables DCOS_CONTROLLER_INSTALL_DEMOS and DCOS_CONTROLLER_INSTALL_DOCKERCLOUD_HELLO_WORLD the cluster is already up and running with the Marathon load-balancer and a simple Hello-world application that we can use to get to know the setup a bit better.
First let’s check the AWS ELB status since it may take some time for it to detect the nodes being up and running.
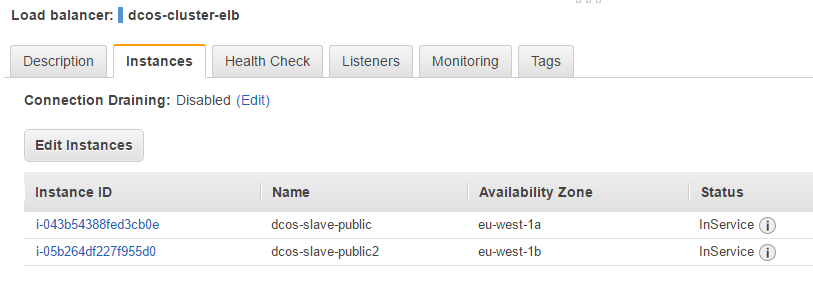
As you can see both DCOS public nodes are in-service. Switch to the Description tab and copy the DNS name of the ELB, e.g. dcos-cluster-elb-2100053169.eu-west-1.elb.amazonaws.com and paste it in your browser. You should then be greeted by the page:

Log in on the DCOS admin
To be able to do some interesting stuff we need to be able to access the DCOS admin console and thats done by opening a SSH tunnel via the dcos-ssh-jumphost instance as:
$ ssh -i <path-to-ssh-key> -L 8443:<master-private-dns>:443 ubuntu@<public-dns-of-ssh-jumphost>
where
path-to-ssh-key— your private key used above for provisioning the cluster nodes. The-iswitch is not needed if you’re setting up the tunnel from yourssh-agentshell.master-private-dns— the private DNS name of one of the dcos-master nodes, e.g.ip-10-0-1-217.eu-west-1.compute.internal.public-dns-of-ssh-jumphost— the public DNS name of the ssh-jumphost node, e.g.ec2-52-213-150-225.eu-west-1.compute.amazonaws.com.
When the tunnel is up you can now access the admin console at https://localhost:8443.

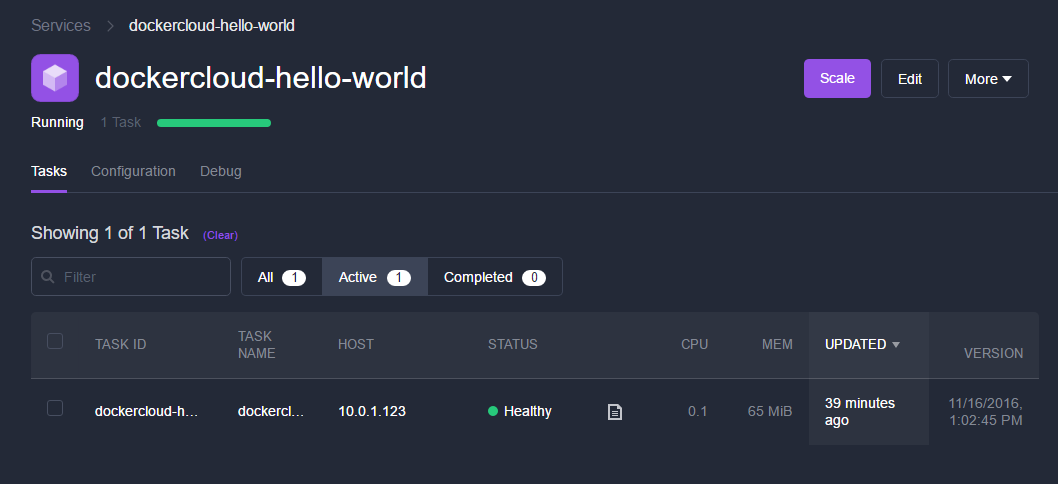
Click on the docker-cloud-hello-world service and you’ll see on the detail view that we have a single instance of the application running:
Let’s try and scale it. Press the Scale button in the upper right corner and scale it to three instances. After a few seconds there should now be three instances running:

Refresh the web-page a couple of times and you will see that its automatically load-balanced in a round-robin fashion (notice the hostname changing):

Scale it back down to one instance and you will have only one hostname. Pretty awesome I think.
Wrap up
In this post a DCOS cluster was configured with a simple application deployed but the long-term plan is to use the cluster as a foundation for more complex demos involving backbone services such as Kafka, databases, CI/CD pipelines, surveillance and monitoring etc.
By having the demo’s setup defined as code its easy to extend with new demos thus providing a simple way to evaluate technology stacks.
The long term goal is that the project should evolve into a scaffolding tool i.e. the cluster equivalent of Yeoman or JHipster, where you can pick and choose components to build a skeleton infrastructure based e.g. on the Netflix stack.
It’s probably clear by now that the project is work in progress and if you like to contribute I’ll happily accept ideas, feedback, suggestions and/or pull-requests. Also, this post is a bit incomplete, among the things I would like to add is a schematic view of the cluster from a network perspective but as you know “Perfect is the enemy of good” so the post may be updated at a later date.
Tear down the cluster
When you’re done experimenting with the cluster I recommend that you tear it down since its quite expensive to have it running for any longer period of time. If you want to play with it some more at some later time, just set it up again.
At this point you have to tear down the cluster manually but I plan to offer a playbook to automate the process.
To tear down the cluster do:
- Terminate all EC2 cluster nodes using the AWS console (EC2 dashboard).
- Delete the EC2 elastic load-balancer (EC2 -> Load Balancing -> Load Balancers).
- Delete NAT Gateway, the NAT gateway take some time to delete but you have to wait for it to be in “Deleted” state otherwise it will lock resources preventing you from deleting the VPC (VPC Dashboard -> NAT Gateways).
- Delete VPC, deleting the VPC will delete most of the resources still allocated (VPC Dashboard -> Your VPCs) except the EIP.
- Release EIP, release the Elastic IP address. (VPC Dashboard -> Elastic IPs).
If you now check the VPC dashboard you should have no resources left allocated (there might be a few resources like the NAT Gateway not yet garbage collected).